Quantcast
Channel: Modern Synthesist
Viewing all 150 articles
Browse latest View live

Haemonculus from Cephalyx Overlords conversion (Flesh Friday)

$
0
0
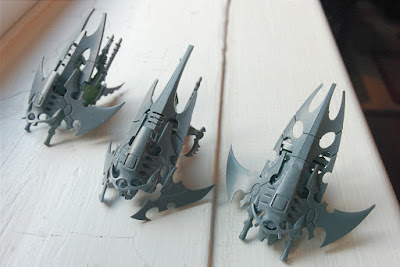
As soon as I saw these guys, I thought they'd make perfect Haemonculi.

In the fluff I've created for the Coven of the Unmarred, one of my main juxtapositions/weird and hideous bits of creative reasoning is that the Coven is obsessed with perfection. Well, at least the Coven's master Haemonculi/Coven Archon are. It's a kind of pyramid scheme, I guess, wherein the Dark Eldar at the highest level of Coven get to be pretty (or "unmarred") because of all the hideous experiments that have been attempted on the twisted creatures beneath them.

Narcysus, High Lord of Flesh, tolerates having his mutated and tortured disciples around him as his own beauty is reinforced in comparison to them, but he refuses to tolerate their marred faces.


This is a good explanation for the masks worn by the Wracks and Grotesques naturally, and it also gives me a theme I can carry over to the rest of the Coven, where anyone who has their face uncovered must live up to Narcysus' standards of beauty.
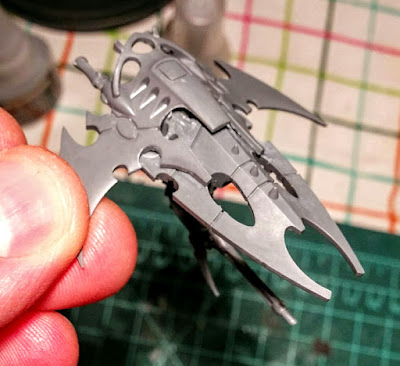
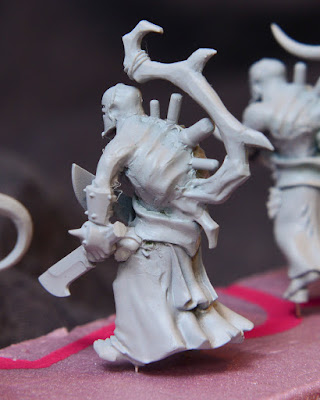
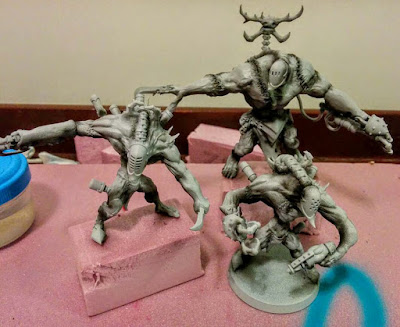
When looking for alternate Haemonculus models, I stumbled upon the cephalyx overlords, and I was instantly sold on their labcoat-like robes. They also fit my "anything hideous must be masked" fluff.

The only issues was that they were a bit too neat and tidy to be Haemies straight out of the box. Also, though their additional limbs were nice they were far too mechanical and needed to be fleshed up, and they needed a sump for them to be sprouting from.

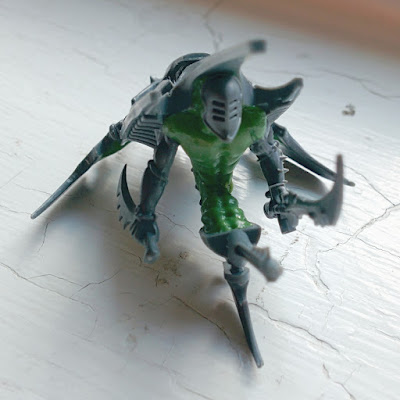
Here's how my first Cephalyx Haemonculus came out.
The cephalyx are a little short, so I added some height by picking up on the Haemonculus levitation/feet never touching the ground fluff. To make the levitation happen, I pressed a Nagash spine into service, cutting between the vertebrae, and using a pin vise to drill holes through them to accommodate a piece of wire. This let me re-position the spine as needed. I also used some Hellion bare feet to complete the levitation look since the Cephalyx models don't have feet.

I added another spine above the first to extend it from the Haemonculus' sump, then crowned it off with a savage orc bow. I'm really happy with the effect as it's reminiscent as some of the really awesome spines illustrated in the Haemonculus Covens book.


The goal with this Haemonculus was, well, to just have one done. I've spent months, off and on, over years converting Wracks, Grotesques, Raiders, Warriors, Wyches, Clawed Fiends and Urghuls, Mandrakes, Cronos for the coven, but I hadn't built a single Haemonculus! That seemed a bit wrong. I wanted to get this one done mostly as a proof of concept, so he isn't my best work, but, well, he's done.

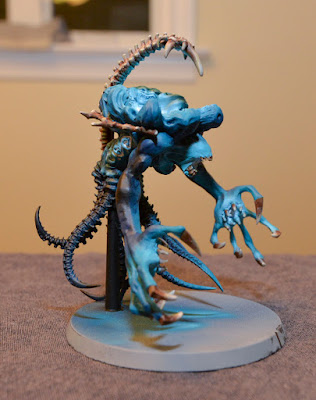
He's also got a friend since I was so happy with the way he turned out once I added the spinal column and orc bow above his head that I wanted to try it on another model. Enter the Finecrap Finecast model that I was generously gifted by Thor on The Dark City in last year's Secret Santa Space Raid.

I can take no credit for the very imposing pose. I 100% cribbed it from this very nice Haemonculus conversion. I'm no longer sure where I found it, but I believe it was on the Dark City, and I wanted to give credit where credit is due because it makes the Finecrap Finecast Haemonculus so much better.
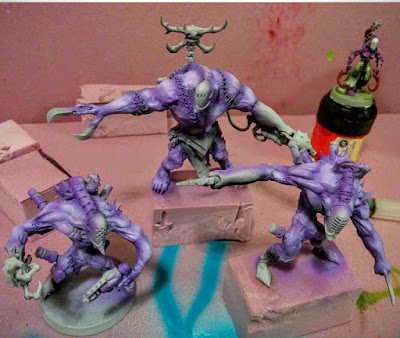
The creator also made the following Haemonculus, which is pretty nice:
Here's a shot of the pair of my Haemonculi:
What do you folks think of them? As I'm trying to put together the coven to end all covens, they will likely be followed very soon by some more Haemonculus friends (I think I have six or ten Cephalyx to get through!).


Coven Reaver Jetbike Conversionm (Flesh Friday)

$
0
0

In my ongoing quest to convert haemonculus coven versions of every dark eldar unit in the codex, I've been rolling around the question of reavers for a long time. Well, I always knew that I wanted to convert them to look something like miniature Talos, but I wasn't sure how I was going to pull it off.

Until one day a couple of weeks back when I was just messing around with a Hellion skyboard and a reaver jetbike canopy. I placed the skyboard on top of the canopy, and—BY GOD—it just...fit. As in the two model components pretty much slid together like they were meant to be that way.

All that was required was some slight trimming of the underside, and VOILA! MICRO RAZORWING JET FIGHTERS!

I was ecstatic. So much so that I quickly slapped together two more of them from the reaver canopies I had lying around:
That last one had its "wings" facing the wrong direction, so it's awaiting a suitable graft of reaver bladevanes.

But what to do about the riders? Picking up on the Talos theme, I wanted the riders to be fused into the mechanics of the jet fighters underneath. It would imitate the way that the talos kind of hangs down from its mechanical carapace, and it wouldn't distract from the jet-like profile of the upper side of the model. In fact, it was as if my idea were meant to be as there is a little cavity beneath the canopies in the perfect place for a head!

I could have messed around with some torsoes to squeeze them in under the canopies, then fill in the rest with greenstuff, but my work on the coven mandrake conversions taught me that all that cutting down is more trouble than its worth.

So I filled in the space with aluminum foil (the cheap sculpting filler of champions), sucked it up, and tried sculpting some chest/stomach musculature for the pilots, and it came out way better than I had expected it would.
For the spinal columns on the back of the models that connected down to the weapon pod, I could well have sculpted that, too, but I had some Nagash spinal columns lying around, and they allowed me to count out vertebrae to make sure all the spines were a similar length.
My main concern with the models, which I posted about on The Dark City forum, was whether they needed arms, to hold the requisite splinter pistol and CCW to identify them as reaver jetbikes, or whether that was already implied enough and I could leave aerodynamic stumps where arms should be. Here are the photos I gave for consideration:
 I'm leaning toward the more aerodynamically friendly while also horrific armless/stumpy wonder. I figure that, if you look at a reaver pilot, he/she isn't prominently holding a splinter pistol or a CCW, so why should I bother. If I do include arms, I will save them for the Arena Champions so that I can differentiate them.

What do you folks think?

I've been, quite literally, going like STINK on these models because I was so excited with them, so I only bothered to take some really poor cell phone photos of them completed before moving on to priming and painting.
 That being said, I have since passed these bad boys under the airbrush. Though they're one of my first airbrushed models, I don't know if I did it right, but I like the look of them >:)
SHOCK. HORROR. A PAINTED MODEL FROM MR. PINK! Hell hath frozen over! 

See you next Friday :)

Converted Dark Eldar Grotesques & Aberration (Flesh Friday)

$
0
0
What feels like a thousand years ago, I converted the guys below as part of a commission to create a haemonculus coven for a client.

...And they had some cool little details...
...and they took me FOR. EVER.

When I decided it was about time I do my next batch of Grotesques, I wanted to get them done quick and get them painted so I could see how my test scheme would work on them. I made them part of my October Modeling vow of stuff I would get done by the end of the month to keep me motivated.

It worked pretty well:

 I'm not quite fond of that last big, bulbous spinal column, but, like I said, the goal for these guys was SPEED. I'm really good at doing "just one more thing" on a model, and then it never gets done. These days I'm trying to actually finish them and get them painted. 

So, on this, the second last day of October, I am happy to report that my grotesque squad is...

...almost done.
While I hammered through these guys, going for a MVP conversion of the much-loved Paulson Bioterror model, I put a little more work into converting the Aberration to lead the squad. He was converted from one of the beautiful new Skaven Stormfiends. I feel like I could write a whole blog post on this one model alone, so I will, and I'll just give you these pics of him almost finished so I can stop writing and get back to work on him ^_^

Suffice to say, I'm pretty pleased with how he's turning out! Hope you like him :)


Happy Hallowe'en, Fleshcrafters!

$
0
0

I wanted to wish all of the fleshcrafters and monster makers out there a happy hallowe'en. To celebrate this most haemonculic of holidays, I carved a pumpkin in honour of my cult, using a sigil design that Brother Pink has been developing for the Coven of the Unmarred.

It's meant to represent the juxtapositions within the fluff of my coven: the idea that the Archon of Flesh and his inner circles are beautiful and unmarred, while the rest of the coven is made up of masked, twisted masses.

Using a very poke-y tool, I painstakingly pointilized that design onto my pumpkin, then went to town with some wood carving chisels. It was my first time using chisels on a pumpkin, and I HIGHLY recommend it if you're planning anything amazing with squash.

Here's hoping you had some hallowe'en themed projects of your own!


October Modeling Vow Complete (Flesh Friday)

$
0
0
Though it's the case that I didn't finish this modeling vow IN October, it is the case that I MADE the vow on something like October 16th, so I'll call that a victory.

On that day, I vowed to my Dark Kin on The Dark City forum that, come end of October, I would have finished:

- Building and converting my first squad of Grotesques
- Painting a 10-man squad of Kabalite Hunters
- Painting 1 Haemonculus
- Painting 5 Mandrake Cronos Parasites
- Painting 1 Cronos Parasite Engine
- Painting 3 Reavers

Here are the results:


1 Squad of Grotesques: BUILT!


10 Kabalite Hunters: PAINTED!

1 Converted Haemonculus: PAINTED!


5 Mandrake Cronos Parasites: PAINTED!


1 Cronos Parasite Engine: PAINTED!

 3 Reavers: PAINTED!

...and that is the most models I have painted in a LONG LOOOONG time, so I'm feeling pretty accomplished about it.

Now, onto November! For my November pledge, I hope to...

- Build 10 converted Wracks
- Finish converting 1 Coven Raider that's been sitting around for a LOOOONG time
- Finish converting 1 Talos-ified Venom
- Paint 5 Coven Nurses (Wych stand-ins)
- Paint 1 Haemonculus
- Paint 1 Raider as a ride for the Kabalite Hunters
- Paint 3 Grotesques

This is what they look like at this point:

What are your modeling vows for October? I feel like these vows are really great ways to keep on task, so please share your own!

Introducing Vestigial Twin: The Modern Synthesist Podcast

$
0
0
Hi Everybody!

It's Brother Pink here, and I'm certain that everyone was as thrilled as I was when Mr. Pink started kicking his flesh-crafting into high gear!

I was so thrilled that I started to hound Mr. Pink about recording a podcast with me. By hounding, it was more like this:

Brother Pink: Let's do a podcast!
Mr. Pink: Do I have to do anything?
Brother Pink: No, I'll do everything.
Mr. Pink: SURE!

I decided to call it 'The Vestigial Twin' as it suits the twisted nature of flesh crafting as well as our relationship. If you're wondering what a vestigial twin is, all is explained in the podcast.

Mr. Pink and I are brothers and one of the things that is most similar is our voices. Listening to a podcast with two guys with the exact same voice wouldn't work. I got really pumped about doing some voice acting, so the host of the first episode is Kraekorr, the haemonculus. I really tried to rein-in the theatrics. Also, Mr. Pink addresses this character exactly as if it were his brother.

If you really enjoy this character, I left a couple of extra bits with Kraekorr at the very end, which you are in no way encouraged to listen to.

This first episode we just talk about Sculpting; the action figures that first inspired us, how we first started sculpting, various materials we have attempted to sculpt with, and projects and people that really inspired us.

There were a few hiccups: Mr. Pink is a tad too quiet (he now has the 2nd best mic on wirecutter.com), and I have a slight case of the sniffles. The call drops soon after I talk about helium filled terrain ideas and Mr. Pink may or may not encourage listeners to plunge their hands into buckets of plaster (which will cause serious harm).

The Opening song is 'Drop' by a Japanese band called Thee Machine Gun Elephant, and I have absolutely no permission to use it. The song at the end is 'Parasite' by a great band called Gammage. They are such a great band, they actually gave me permission to use their song!

We really hope you enjoy our podcast. Bare with us, it is the first episode. There will be immeasurable improvements for the next one.

Here it is, The Vestigial Twin:
The Vestigial Twin, Episode 1, Sculpting


Converted Dark Eldar Wracks complete (Flesh Friday)

$
0
0
 Well, I've officially polished off the first part of my November modeling vow by completing the conversions and sculpting on my first unit of Wracks since the Bob's Big Bad Coven commission.

This time I opted to use arms that were much more to scale with the models (last time I used mostly big, beefy, and LONG bloodletter arms), and I'm much happier with the effect. I also used mostly actual wracks arms (though sometimes converted) along with actual wrack masks to mask the fact that I'm using flagellant lower bodies and bloodletter upper bodies to sub in for the actual wrack models. I also sculpted on some combat cumberbuns to merge the two pieces/tie them back to the actual wracks.
Why go to so much work, employing bits across to many different stock models?


1) Wracks are expensive. Close to $50 for 5 models? If I want to have any hope of fielding a full carnival of nightmares (or whatever the formation is called), I'm going to need about 45 wrack models. That is a whole lot of $50 boxes when it takes $100 in wracks to build a 10-man squad I'd rather just bits order the parts I need, along with some bits I already have lying around, to pump out 10-man squads for close to $50.
2) Conversions are fun! If you've been following my work, you know I'll never use a stock model when I can, instead, use something more interesting/converted.

3) Wracks are boring. I remember getting the Haemonculus Covens book and nearly falling asleep when I looked at the modeling pages. I actually wondered if they'd painted all those wracks, or if they'd simply copy and pasted the same five models over and over again. It could have been done so simply since the 5 sculpts in the box are, pretty much, copy-and-paste jobs of one pose with slight changes.

That's a lot of words. Here are some photos that I think illustrate why I've done what I done very clearly:
See? Bent, twisted, muscled, and very clearly coming to tear you apart! I liked that initial wrack, assembled stock from the box, but I love those scythes so much more on a model who looks like he might have the first clue what they're meant for.

This is my vision for wracks. Sure the original pose has a kind of mindless, implacable legion vibe to it, but the hunched profile of the bloodletters, combined with the dynamic posing of the flagellant legs, does a much better job, in my opinion, of depicting a twisted and dangerous servant warrior of the Haemonculus fleshcrafters.

THAT'S why I can't leave well enough alone :)

Here's hoping you like them as much as I do >:)
That old Haemonculus in the above photo is meant to serve as the squad leader. The fluff I came up with for it is that certain haemonculi who have fallen out of favour with the ancients in my coven and stripped of their mask and demoted to doing menial things, like leading wracks into battle.

Really, I wanted an excuse to include every haemonculus model GW has ever made in the force, but the old pewter ones were too hideous for positions of power in the army. 
 ...and though I did an arm swap on the Haemy to give him a Hexrifle, I wanted to preserve his destructor as the squad's Liquifier (see above)
 The blade bits I used came mostly from hellions (those glaives are AMAZING as knives/cleavers), and Skaven.
 Above you'll see my converted Osteofactor. I built it from some discs from the Talos kit, a gun from a Wraithguard, some tubes from the back of a scourge, and one of the thrusters from a helion. It's beefier than the actual model, but that works for me. I've also modeled that wracks to look like the munitions are spilling into his system and causing some unfortunate bone growths.
...and here are some more random shots:


 The beauty of Savage Orc Bows!

What do you folks think of them?

Dark Eldar Grotesques Aberration Painted! (Flesh Friday)

$
0
0
Well, this feels pretty good.

Though I may not have succeeded with as much of my November Modeling Vow as I did with October, but I still feel like I accomplished some good things in November, chief among them, for me, is having finished painting AND BASING the unit of Dark Eldar Grotesques that I finished modeling in October.

That last basing bit is key. Anyone who has known me for a while can attest to the fact that I'm far more interested in modeling and sculpting than I am in painting and basing. Though I said I finished a lot of things in October, NONE of them were based. I fixed that his month, forcing myself to get over how boring I find basing, and have now nearly finished basing all the models I painted in October.

The full idea and process behind my bases is something I'll go into in a separate, fuller article. For now, the general concept was that I wanted them to represent the floor of a Haemonculus' workshop: a slick, bloody mess, some of which looked like it might actually be alive.

For painting the Grotesques and Aberration, I took the colour scheme for The Hexed from the Haemonculus Covens book...

... and combined that with a version of the purple flesh that Doctor Faust suggests in his Talos Painting Tutorial...

...to come up with this.
I wasn't 100% pleased with resorting to drybrushing on the Grotesques, particularly since they have such vast tracts of bare skin. I had an airbrush, so I figured I should give that a go. Having seen a lot of people doing preshading with an airbrush on Instagram (and if you're on instagram, please look me up on there as I'd be happy to follow you!), I gave it a go:

...but having little to know idea what I was doing, and not being sure that I was using the right airbrush paint for the effect to have any...effect, I feel like it mostly acted as a reminder to "keep these areas dark. Here are the Grotesques after the initial purple coat:
And, having been pleased with how well the airbrush handled fabrics/robes on my initial Wracks test model above, I did my first experiment with masking and airbrushed the non-purple parts:
THAT I as extremely happy with, particularly on the Aberration / Stormfiend's tabbard (though here some of that beautiful work has been obstructed by gore :P).
Here's some WiP on the Aberration where you can still see the tabbard:
In the end, the scheme I fully pioneered on the Wrack model translated pretty well to the Grotesques:
The Paulson Games Bioterrors that I used turned out pretty well:


However, I am most happy with the Aberration since I plowed so much greenstuff into him.
I quickly learned that stitches are WAAAAY more fun to sculpt than they are to paint. I did a first pass on them, was pretty impressed with myself, then showed them to the Norn Queen, and she told me they were basically crap and I could do better. So I had to.
All together, they make a pretty good crew!
How do you folks like 'em?

Long Time No See!

$
0
0


Hi Everybody!

Long time no see!

Brother Pink here, and I have minimal hobby progress to report on.

Last month, I roped Mr. Pink into crossing the globe for some sort of momentous occasion and it threw a major monkey wrench into both our hobbies.


Anyone that follows the Modern Synthesist Hobby FB page, or modernsynthesist on Instagram might have noticed Mr. Pink is painting again! I don't want to toot my own horn, but it's mostly because of me.

I told Mr. Pink that if he paints 10 models by June 30th, I'll buy him Gal Vorbak. I'm not saying he's taking a leap into the 31st millennium, but he sure is 30kurious. Of course throwing more models into Mr. Pink's bottomless pit of Hobby projects might not solve the problem, but it could serve as some strong motivation, also, I'd hope he'd return the favour by throwing a similar challenge back at me.

In March, a site called 'variancehammer.com' put on the 'Feast of Fluff' contest, and it served as a great motivator to get a model or two painted as well as develop the backstory for my Blood Angels. I've always had some fluff bouncing around in the back of my head, getting on paper was not as easy as I thought. Anyone interested in my submission, here's the link:

http://variancehammer.com/wp-content/uploads/2016/04/TheBloodBedouin.pdf

The base model I used for the Assault Marine for he competition, was a Second Edition Khorne Berzerker.


Really, the only part I wanted from the model was the face. Back in an old edition of 40k, a Blood Angels could fail a test and spend a turn drinking blood. I thought these Khorne helmets would really facilitate blood drinking.

First step was taking off the Khorne symbols and removing the left arm. The arm makes the model seem squat.


Next, I had to remove the 'bunny ears'. When removing the horns and the left arm, there was a lot of material to remove. I was also able to whittle down the plastic, to add details that would be located beneath the details I was removing.


Here's the sergeant before I started to paint. This was the first model I used Vallejo's German Red Brown primer, and I freaking love the stuff. Before I was priming Grey out of a spray can, then mixing red and brown to make a dark base colour, but I've combined both steps into one! I also love being able to apply primer by hand. It means I can prime indoors, in the winter!


I painted the Fast Attack marking 'freehand'. Originally I tried to paint it yellow, but it looked very Chaosy. I really need to start learning how to properly apply water slide transfers, but this model needed to be completed for a deadline.


Here's another 2nd editon Chaos Space marine, I made a year ago,. He has been converted to be less heretical.


As I was working on the Assault Marine, I was also making a heavy flamer Space Marine. It was one of those situations where I wanted a Heavy Flamer and that superseded the importance of appearance.


Pardon the black and white photo, I'm rather ashamed of the colour of the legs. The model is a ton of random bits slapped together. I used a Forge World [Heresy Era] shoulder mounted multi-melta, lopped the barrel off and slapped on a heavy flamer one. The left arm is from the 3rd ed missile launcher, and I have no idea what set contains those kneeling legs.

Here's the dude all painted up.


In a post I made a while back, I mentioned that I was converting a Sigmarite. I had got halfway through painting, and I thought the power sword would look cool as a glowing red colour. That was a mistake. Right now I'm working on a Blood Champion and his power sword looks way better as a dark blue.


So keep an eye out, this guy will hopefully be done in the next 3 months.

I have been putting a bunch of work in on making terrain.  I was diligent enough to document the process, so once the three pieces are painted, I'll share the process.

I've started this hobby train rolling agian, so please have a little patience and I'm sure Mr. Pink will have some super sexy pics up soon!

Genestealer Cult Returns! Inspired by The Strain

$
0
0
Hokay, so.

A long time ago, I got an idea for a Genestealer Cult, featuring some creepy dudes in black trench coats, and I swore that, once GW released plastic greatcoat guard, I would convert up my stealer cult.

So that never happened, but Games Workshop did release Genestealer Cult models, and—holy moly— are they every beautiful, and absolutely SPOT ON the Genestealer models of old, except modernized to compete with the surreal level of plastics currently coming out of GW. In case you'd missed it, they were sculpted by my new hero, Darren Razza Latham.

Though I had been holding out for greatcoat guard to start my cult, this release forced my hand.


Now, to be clear, I am completely, head-over-heels, moonstruck, gobsmacked in love with the new Genestealer Cult models. However, one thing I'm less than in love with is the fact that the majority of people I see on the net are painting their cultists in pretty much the same scheme from the box.

HOW BORING.

There are some notable exceptions, like the following, which, conveniently enough, were painted by the same Darren Razza Latham who designed the models:
Or These, by @helgewilhelm, who you really need to be following if you're not already:
...and I do REALLY LOVE the yellow/orange jumpsuit, penal scheme for them, but—for the most part—everyone seems to be using the GW, Overkill boxed set scheme for their cultists.

I decided I wanted to do something different. When I came up with my aforementioned idea for creepy cult dudes in trench coats, I always pictured them in head-to-toe black...which can be a very boring scheme.

I was at a loss for how I would make black into an interesting scheme until I came across Guillermo Del Toro's vampire series, The Strain—which should be mandatory viewing for any nid/stealer fan!
If you're not familiar with The Strain, allow me this brief diversion to bring you up to speed with the series, and how it has anything to do with a Genestealer Cult.

The Strain deals with a vampire outbreak in Manhattan, and how modern society just assumes it to be some particularly virulent plague. I love this premise because I fully believe this is how we'd first process a vampire outbreak in our post-SARS, Pandemic-loving world. The assumed "outbreak" in The Strain even arrives state-side via a passenger plane, as illnesses like SARS have done.

And, in the way that the infestation spreads in the Strain, and the way that there are clandestine, shadowy organizations both supporting and combating the outbreak, I was very much reminded of the fluff for Genestealer Cults and how they spread under wraps in the 40K universe, often protected and nurtured by an infested branch of the local government or military force.

The vampires/strigoi in The Strain are a bit more tentacle-y than you'd expect, which makes the parallels to a Genestealer/Tyranid infestation all the more accurate for me :D
Anyway. Getting back to the point of how I figured out my paint scheme. In the Strain, there is an opposing vampire faction seeking to contain/combat the infestation of Manhattan. Why, we're not too sure. However, to help them in their grizzly business, they employ a force of "Sun Hunters": vampire hunting vampires, who move around during the day under the cover of hooded black fatigues.
In addition to always wanting to start a Stealer Cult,  I've always wanted to paint some black-ops looking miniatures, and I figured the all-black-with-red-hood Sun Hunters uniform would serve well for my stealer cult.

For my first cult miniatures, I was focused on just getting them painted so that I didn't spend too much time languishing in conversion/kitbash never-ending spiral. For my next batch, I intend to try my hand at sculpting hoods on for all of them, but, for now, I just wanted to get a defined paint scheme and get it right.

The greenish skin I elected to use was also inspired by the strain, though I've gone a little more green than them, and I'm thinking I should rein it in a bit on the more human hybrids so they look closer to flesh colour.

I also kept the Tyranid carapace black on the more genestealer-y / mutated ones amongst them to keep the overall black theme to the force.

The red accents are meant to pick up on the red highlights on the inside of the hoods that the Sun Hunters wear in the Strain. My idea is that, as the followers are more mutated and dress in more robes than armour, these robes would be red, and you''ll see more of the red spreading through the force as you move away from the more passably human, covert ranks.

So, though I'm not 100% on the scheme yet, it's pretty close, so I wanted to share it everyone to see what you thought.

And, as a teaser for the future, if you're familiar with the Strain, I intend to blur the lines a little on Strain canon. Stealer cults are lead by a triumvirate of Patriarch, Magus, Primus, so I'll be casting:


The Master as Patriarch


Quinlan as Primus


...and Eichorst as Magus

Though I've so far failed to find an adequate model in either a suit, or a fascist military garb, so if you have suggestions, please share!


________________

Oh, and a note that I wasn't sure where to get into: this stealer cult content is brought to you by the insistent cajoling of my dear Brother Pink, who is the single best person at getting me off my ass and back into the hobby.

He usually does it with a bribe (and this time it was Gal Vobrak models! YES!), but I choose to believe that behind the bribes lies his faith in my modeling mojo and his understanding of my intrinsic pressure motivation.

It was his challenge that got these first few cultists painted, and—now that I've seen them with paint on them—I'm inspired to make MANY MORE!

So, here I am, back on the hobby horse, and we all have Brother Pink to thank :D

Genestealer Cult Teaser Pictures Analysis (Rumours)

$
0
0
I typically don't go in for rumour posts, but I feel like all the attempts to decode the Genestealer Cult teasers posted on GW's 40K Facebook Page have been a little amateur hour. A lot of people are talking about seeing Power Loaders and mechs in those grainy, shadowy photos, and I think it's just optical wishlisting.

I ran a couple of the photos through Photoshop's ENHANCE! filter, and here's what I came up with:

First up, we got this one, which came out yesterday:

 In the foreground, we pretty clearly have a dude with a massive mining saw. Some have speculated this is one of the big, mutated Aberants from the Overkill box, but if you look at the top of it, the figure clearly has the squared-off mining armour that the various hybrids wear. In the following, ENHANCED photo, you can also see the figure's left hand holding the saw at the top. This version also lets you see clearly that there are TWO blades on the saw, which looks pretty scary.

You can also notice the squat, twisted leg beneath the figure, and the guard over the saw blade. Looks awesome, and can't wait to get my hands on one! The purple cast to the head and hand, as well as the twisted legs, lead me to believe this is one of the more genestealer-looking hybrids, not one of the human-looking ones (Are we calling them acolytes now?).

More interesting is the image behind this guy, which is far harder to make out. Here's my ENHANCED version:

THAT looks to me like a hybrid who has actually realized how to wear the Geordie-Laforge-inspired visor on the mining laser model from Overkill.

I love the visor and HATE that head since he's got the visor flipped up across his forehead and not over his eyes. THIS model, on the other hand, looks great, and something about the head leads me to wonder if he's actually wearing a full, closed mining helmet that the visor is a part of. It's hard to tell much else. The model clearly has 2 arms, but might have three as the right arm is raised, and we normally get this on models that have a third arm sprouting below. There's another hybrid beside him in the mining armour, and they're standing in front of something that looks like a Rhino but is probably the new Cult wheeled vehicle/transport (?) that we see in drawing form the Genestealer Cult teaser video.
Let's talk more about that wheeled vehicle :)

Though I didn't LOVE it in the above still from the teaser, it had potential, and I'm a little more in love with it in the teaser GW posted today:
 Specifically, once I ENHANCED this one:
I believe that the weird, wheeled thing on the left  of the photo is clearly this new Cult car thing. People are calling it the "Limo" out of respect to old cult fluff, but it's clearly some kind of utilitarian mining truck, which I LOVE.

The limos that the original genestealer cults would roll around in were kind of hilarious, and we all feel some nostalgia for them. However, the design of the original cult models was really...weird, without any real explanation for it. Thus, they could get away with using a really weird form of transport.

However, with the new Genestealer Cult, GW has done such an excellent job of explaining their weird garb as mining armour, and this new codex promises to carry that theme through with the cult using repurposed tools like mining lasers and saws to wage war (heck, they even say it explicitly on the quotation overlaid on this teaser image!).

I LOVE this idea, and I can't wait to see how far GW takes it. It is perfect for a resistance force that doesn't have military support. However, if you try to shoehorn a limo in there, just for wish fulfillment of us codgers old enough to remember the original cult, it's not going to make any sense within the new aesthetic of the cult.

If you're really hurting for a limo, just field one to count as the new mining truck that the cult is using :)

From this silhouette, I really like the look of this new mining truck! I was worried it would come out a bit too much like the Taurox, which I feel is far too tall and a definite tipping hazard. This truck looks more wide and squat, which I'm excited about.

Back to the image, the other fun thing we see in there is a solid confirmation that Genestealer Cults have access to Leman Russ tanks! YES!
I'm sure there will be some rules about them breaking periodically to represent the fact that the cult just stole them from the Imperium, but I'm ok with that. I have little love for the Leman Russ model itself, but having its slot in the Genestealer Cult list allows me to shoehorn in a converted Mechanicus Dune Crawler as some kind of big mech mining rig/tank. YAY!


The final bit of this second teaser image is the hardest one to parse:
I think this is another view of the new truck. I think we're seeing the knee/shin of one of the riders on top, and the turret that's going to be on the thing. The turret looks to me like twin linked autocannons with banana magazines curving up over them. We can also see the railings of what I'm assuming is an open crew compartment on top of the truck.

And that's about all I have. What do you all think of these leaks? Are you getting as stoked about the Genestealer Cult release as I am?

Genestealer Cult Armoured Sentinel conversion - Magitek Armour

$
0
0
I MADE A THING!

I've been horrible at blogging lately, but I promise you I HAVE been making Hobby progress and sharing it on my hobby Instagram here: https://www.instagram.com/modernsynthesist/, as well as my hobby twitter: https://twitter.com/Mod_Synth

Heck, I even cross-post this stuff to Facebook, Tumblr, Flickr, and Pinterest, so, really, you can pick your poison.

Anyway, I haven't been sitting around on my hands, and I mean to post more on the old bloggerino soon, but for now, here are some photos of my latest creation, without all of the chin-wagging I normally do, which keeps me from actually posting blog posts!

It's an armoured sentinel for my Genestealer Cult force. I want to include sentinels since they give me the chance to create some mining mecha, which the Cult force is sadly lacking!


This one was inspired by Brother Pink suggesting he'd like to make some Magitek Armour, from Final Fantasy III / VI, using one of those lanky Ad Mech walkers.

Here's Magitek armour for reference:
And how it looks in-game:


I didn't see how he could do it with the model he suggested (the longstrider?), but as I considered the Ad Mech line, I realize the Kastellan Robots could very easily be converted into magitek armour! I bought the requisite robots for the idea, but I didn't get around to starting on the idea until this Thursday, during my office hours at the local Games Workshop. Here's how far I got:

...and then the idea sat like a stone in my mind all Friday. I couldn't stop thinking about it, and staring at the print of Terra from FF3 above my desk at work, thinking about how I just wanted to get back to the conversion.
So, come Saturday and Sunday, I got right back to it, and by Sunday night, I was done!

Here's what I came up with. First, the basic armour without weapons arms:


That one, arm-looking thing is the magnetized weapons mount.

You can see this is still 85% Kastellan, with some extra bits along the way from a sentinel/dread. The pilot is a Tempestus Scion head (which is 100% perfect for the Final Fantasy pilot), and the body is left over from a Dreamforge APC kit (the rebreather on his mask wouldn't fit with standard cult armour :(

And here are the arms, straight from Ork kits:


Since the sentinels have a wealth of weapons options, I thought this would be a good chance to take my first foray into magnetizing. I used a Lascannon as the basis for the magnetic mount, and here are all the options:


For my first expedition into magnetizing, I feel like it turned out rather well. All the guns don't sit perfectly, but they're all passably good.

And, all in all, I'm pretty happy with what I accomplished on the model. It's not PERFECT in terms of being 100% Magitek Armour, but it's a pretty damn good piece of mining mech. For my next mech, I'm going to be using the longstrider legs to put together an alternate Scout Sentinel!

For now, here's the Armoured Mech with the box he mostly came from:


Sector Imperialis Easy Urban Basing Tutorial

$
0
0
In this basing tutorial article, I'm going to go over how to whip out nice looking bases SUPER quick using the brand new Games Workshop Sector Imperialis plastic urban bases.

I'm going to go through two tutorials: an Easy Formula for straight up Sector Imperialis urban bases, and a Fancy Tutorial for people who want a little weathering/rusting on the bases.

The two basing tutorials are mutually exclusive, and, though the Fancy formula contains the Easy one, it has extra prep that comes before the Easy formula. So if you want Fancy, please skip down to that.


MR. PINK'S BLATHERING (feel free to skip down to the tutorial)

So, like I mentioned in my post about my first forays into a Genestealer Cult, my brother is one of my greatest hobby cheerleaders. It is thanks to him and his cajoling/bribing that I got my engines restarted on the Silent Hill Amnion Talos commission, and it was his challenge to get 10 Genestealer Cult miniatures painted that got me going on the cult.

Since he's of my blood and has been with me through my whole hobby journey, he knows that I really enjoy getting bogged down in sculpting and converting, and that painting is my least-favourite part of the GW hobby. He knew that, given the option, I would spend MONTHS puttering away with converting the genestealer cult troops, so he challenged me to paint 10 of them, straight out of the box, before I convert anything. 


That plan definitely worked. And, now that I've actually painted them, and like the scheme, I'm more motivated to paint more of them!

But what does this have to do with basing? Just as I'm likely to spend a pile of time converting and sculpting, I can get caught up using a lot of time in making bases from scratch. To carry my momentum from painting the cult troops straight out of the box, I wanted to buy pre-made bases to get them done as quickly as the models meant to be on them. The Games Workshop Sector Imperialis bases showed up right on time!

EASY FORMULA URBAN BASING TUTORIAL:

The wonder of the Sector Imperialis bases is that all the detail you need is right there, cast into these plastic bases. If you're looking to get some good bases out, which might impress someone at a tournament, but might not win a Golden Demon, this formula is for you. It's basically airbrushing + drybrushing + washing, then you're done.

So here's the list of basing ingredients you'll need:
  • Black spray primer (or an airbrush with black paint)
  • White or light grey spray primer (or an airbrush with white/light grey paint)
  • White acrylic paint
  • Some different washes in the colour palette you favour (for me, I used GW Ogryn Flesh, Gryphone Sepia, Devlan Mud, and Asurmen Blue, as well as some Vallejo Blue Ink)
  • A drybrush
  • A basecoat brush

And here is the process:

Optional: Mount your bases on a study piece of cardboard, or a long, skinny piece of wood. I mounted mine using bluetac:
Spray prime / airbrush your bases black, making sure to cover all the grey plastic on the bases. This gives you the nice black border that we've all come to expect from the GW bases we've been using for YEARS.
  1. Let the black spray primer fully dry. Give it at least an hour.
  2. Next, using your airbrush or a can of white/light grey spray primer, give the bases a light coat of white/grey from above. This is basically a dusting meant to settle on the high details on the bases, leaving black in the recesses. Also, try to focus on the middle of each base, to leave the edges darker. This gives the impression that the light source on the base is in the middle, and the edges are in shadow. Should look kind of like this (though I did this one backwards :P ):
  3. Let the lighter colour dry. Again, give it at least an hour.
  4. Using your white acrylic paint of choice, apply a drybrush coat to the bases. This will highlight all the edges on the cast detail.
  5. Go to town with washes in your desired colour.

This is where you can apply your own style/colour palette to your bases.

For my bases, anywhere that looked like concrete or flooring/plating, I went for a mostly blue scheme. When you wash white/light grey with Asurmen, the final effect is a blue-ish grey, which is very similar to concrete to my eyes, or a light-painted steel under blue/flourescent light. I then darkened some areas using Vallejo's Blue Ink.

If I wanted really simple bases and was in a hurry, this would have been fine. 

However, I wanted to add a little more contrast and colour depth to them, so I picked parts of bases and added in some earthy colours using combinations of Devlan Mud, Gryphone Sepia, and Ogryn Flesh. These are the older names for the washes, but they're basically: Blackish-brown, yellowish-brown, and reddish-brown. 

When it came to the urban bases that looked more like unmodified earth, I cut the blue out and just played with the combination of browns.

There's no perfect way to apply them, and I mostly just played with them to see how they looked. I also applied them alongside each other while wet to get some blending. On the bases that were all earth (no concrete, or floor plates), I used Devlan Mud (blackish brown) around the edges, then Ogryn Flesh (reddish brown) further in, and Gryphone Sepia (yellowish brown) in the centre to make it seem like the bases were brighter in the middle than at the edges.


Here is a look at the finished effect I achieved at this point.


SLIGHTY FANCY URBAN BASING TUTORIAL:

The wonder of the Sector Imperialis bases is that all the detail you need is right there, cast into these plastic bases. If you're looking to get some good bases out, which might impress someone at a tournament, but might not win a Golden Demon, this formula is for you. It's basically airbrushing + drybrushing + washing, then you're done.

Here are the basing ingredients you'll need:
  • All the Easy Formula ingredients
  • Humbrol Masking Fluid, or some other rubber masking fluid
  • A garbage brush (seriously. It will be unrecoverable.)
  • A dark rust-coloured paint (I used Vallejo Panzer Aces ___)
  • A light rust-coloured paint (I used Vallejo Model Air ____)
  • A bright orange paint (I used GW Blazing Orange that I probably bought circa 1996—OLD PAINT POT WIN!
Here are the steps:
  1. Dark Rust
  2. Light Rust
  3. Mask

  4. Spray prime / airbrush your bases black, making sure to cover all the grey plastic on the bases. This gives you the nice black border that we've all come to expect from the GW bases we've been using for YEARS.
  5. Let the black spray primer fully dry. Give it at least an hour.
  6. Next, using your airbrush or a can of white/light grey spray primer, give the bases a light coat of white/grey from above. This is basically a dusting meant to settle on the high details on the bases, leaving black in the recesses. Also, try to focus on the middle of each base, to leave the edges darker. This gives the impression that the light source on the base is in the middle, and the edges are in shadow.

  7. Let the lighter colour dry. Again, give it at least an hour.
  8. Using your white acrylic paint of choice, apply a drybrush coat to the bases. This will highlight all the edges on the cast detail.
  9. Go to town with washes in your desired colour. I went into detail on my wash decisions at the end of the Easy Tutorial, so please scroll up if you'd like a look at that.

  10. Get out the crumby brush you used to apply the mask. Remove the mask

  11. If you're happy, feel free to leave them as is, or spot highlight the rust with light rust.

  12. If you're happy, leave it, or spot highlight even more with a bright rust.

  13. You're done!

...And then you can add as much metallic or whatever detail as you like, but, in a pinch, the bases above will do.

However, here's a field of my near-finished bases using this formula:
They look way fancier than they should based on how little time I've put in on them :P

Haemonculus Venom Coven Conversion (Flesh Friday)

$
0
0
So, in case you're new around these parts, or I haven't talked about it enough, my main goal for my Haemonculus Coven of the Unmarred force is to create a converted, Haemonculus version of every non-haemonculus unit in the Dark Eldar Codex.

A long, long time ago, in a country far, far away, I came up with a concept for a Haemonculus Raider:

It's mostly a Raider with some gribly bits attached, and a Talos as its engine, and I'd played with the idea of having some spidery arms growing out of the middle of it for carrying its passengers. However, it never really worked for me, so I left the spidery arms off.

I've since given more thought to the Haemonculus Raider concept, and the idea of having passengers suspended from it on some kind of meat hooks, and when I make my revised concept for it, it's going to look a lot like this Coven Venom


The idea for the Coven Venom has been kicking around in my head, loosely formed, for about a year. I was messing around with Talos bits and Venom bits, seeing how they could tesselate, and discovered that the Talos body could fit perfectly in the hollow of the passenger deck for the Venom. 

However, it meant that a lot of things needed to be turned around: the wings and the thrusters were flipped, and something needed to be done about the canopy/fuselage. So I got to hacking and repositioning:


Next came some tinfoil filler and Apoxie Sculpt. 


With that filler, I could already see how well the carapace of the Talos bits could line up with the Venom's canopy/fuselage. On the other side, I also cut up the Venom's anti-grav rig and attached a bit of it to the bottom.

For the transport rack on the back, I used the spinal column-looking tail from the Talos kit, and I sculpted in some filler detail under the canopy/carapace using Apoxie Sculpt:


My concept was that, just like the Talos, this Venom would be exposed and fleshy beneath the carapace, and would look like the creature had been grown into the machine. It's similar to what I'd accomplished with my Haemonculus Reavers:


Here's a view of the filled in carapace from the front, where you can see the meticulously-cut-out-and-flipped air intake grills :P

For all my insistence on collecting forces that are mostly close combat based (Tyranids, Genestealer Cult, Dark Eldar), I still have this inexplicable love of shooting. Thus, I decided to model the Venom with two splinter cannons, and I saw no reason of mounting them each in different places. The whole thing still looked a lot like a jet, so I decided to mount them under the wings, like you might expect on a flyer. 

In this shot, you can also see the flipped-around thrusters:
Once I'd roughed out the shape of the carapace with tinfoil filler, covered in a smooth layer of Apoxie Sculpt, I set to work sculpting the carapace armour plates one at a time. If you've read my How To Sculpt Miniatures series of articles, you know that my second caveat is that patience is your friend. That means you need to take your time when working with green stuff of any kind of epoxy clay. Don't try to sculpt three carapace plates at once. Sculpt one. Let it set. Then sculpt the next.

That's exactly what I did here:

That being said, sculpting in-organic armour is HARD since things need to be symmetrical. As I was rushing this model for Armies on Parade, I tended to take the "JOBS A GOOD ONE" approach to the sculpting, not obsessing with having it as perfect as I could. 

Had I not been rushing to a deadline, this would be the point where I went back with files, sandpaper, and a dremel to clean up the lines of the carapace and smooth out imperfections. 

However, as I was rushing to a deadline, I hoped I could hide the roughness of the sculpting with a paint job that made the Venom look a little busted up and well-used. 

Next on the construction end came the transport rack. Like I mentioned, it is mostly a Talos tail, but I wanted to have some pretty twisted meathooks hanging off the back. A force as twisted as the Haemonculi would never let someone just stand comfortably on a transport deck when they could instead hang still-living flesh from organic, bone spur meathooks!
Ever since I came up with the idea of organic meathooks for the Raider concept. I'd been eye-balling the Tyranid Trygon Antennae as decent bits to stand in as weird spidery appendages. All it took was cutting them at the joints, pinning them back together with thin wire, then bending them into the desired shape.
For the actual hooks on the ends of the appendages, I repurposed the bone spurs from the ends of the bony wrack back growths.

And, if I was going to have this gross idea about carrying living troops around like sides of meat, I might as well illustrate it on the model with a passenger still hooked in.


When it came to painting, I had gotten some practice using Humbrol Masking Fluid on my Sector Imperialis bases to make them look rusted at points. Though I'd painted my coven Reavers to be very clean, I'd decided from here on out the Coven's vehicles should look like they'd seem some heavy usage, so I primed the Venom, rusted it up in places, and masked the rust with humbrol. I don't have progress photos of that, but I used the formula that Doctor Fauss suggested in his How To Paint a Talos video (I also use a modified version of his flesh recipe shown there).

Once I'd masked the rust with humbrol, I just airbrushed up the armour colours.
Once again, I wanted this Venom to look a lot dirtier than my reavers, so I used some Secret Weapon Baby Poop wash. I'd tried the green and sepia washes from GW when I was doing my reavers, but neither worked for me on their own. I'd experimented with Baby Poop on my Coven Wyches, and was so happy with the result that I decided to use it on the Venom.
Washing an area as large as this can get tricky, so I tried something new by applying a decent amount of the wash to the surface, then cleaned my brush but left it wet, then used the watery brush to move around the wash, clearing it from raised areas and leaving it pooled in recesses/lower areas.

It worked like a dream.

Then I went on to paint all the other bits and bobs, and finally it was time to remove the masking fluid on the craft and expose the rusted under bits. Like I detail in the tutorial on quick and dirty sector imperialis bases, the best way to remove dried humbrol masking fluid...is with other dried humbrol masking fluid, like the stuff that's dried on the brush you used to apply it. Otherwise, an eraser also seems to work well...though I had a lot more trouble this time than on the bases, for some reason.

Here's a before and after photo of the top of the Venom:
Those rusty bits were not painted on; they were where I succeeded in removing the masking fluid.

Here's the whole top:
And here's the fully assembled, fully painted venom. It came out exactly as I'd hoped...infact maybe even a little better than I'd hoped! In the end the rough sculpting bits were not that noticeable, and the vehicle made a big splash at Armies on Parade!


And here's the Venom in situ, dropping off its cargo as part of my Armies on Parade board!


What Happened to Hard Foam?

$
0
0
Hi Everybody!

Brother.P. here, brother of Mr.Pink,

With GW starting up its 'Made to Order' campaign and hooking it straight into our veins, nothing can stop the nostalgia tsunami. I'm so pumped for the possibilities of what's to come, but there's something that is most certainly not coming back; Hard Foam Terrain.

This was the only one we had, and Mr. Pink gave it away!!!


I'm not entirely sure what "Hard Foam" is. I think it is a two part polyurethane that expands before hardening. My understanding of this material is solely based on having watched this video: https://www.youtube.com/watch?v=fR8WWkOo8aI

There is a company out there that is still making amazing Hard Foam terrain; http://shop.microartstudio.com/battlefield-hardfoam-terrain-c-73.html

Maybe ten years ago GW had their own line. I assume they mixed-in some pigment to give it a dark base colour and then dusted it with a lighter colour. In instances where it made sense, the terrain came with statics grass applied to the piece as well. The scenery was light and strong, needed minimal packaging and was ready to use right out of the bag... why did they stop  producing it?!!?!

I have some theories...

Firstly, it was a product that did not fit with the direction GW was headed. Everything was moving toward plastics, and Hard Foam was made from a completely different material using a different process. The Hard Foam scenery came pre-painted, all other products are sold un-painted. The fact that it came in a clear plastic bag made it look a little cheap... BUT IT WAS SO GOOD! It may have skittered around the table a little more than heavier terrain, but that's nothing.

Another theory, as to why it was discontinued, is because it was made from a single pour cast. This meant that pieces were easily re-castable by customers. I buy one piece of terrain, make a cast of it, and make a hundred copies and my board is filled with GW terrain when I only paid them for a single set.

Furthermore I believe "Hard Foam" may have given off some noxious fumes, and perhaps GW did not want to work with such a hazardous material, potentially harming their employees.

There were two sets that I currently pine for. Bellow are the "City Fight Ruins" and "Hab Building" in all their google image search glory.


Please, if anyone has any clues why this stuff was discontinued, by drop a message bellow.


Haemonculus Coven Display Board for Armies on Parade (Flesh Friday)

$
0
0

So, as is usually the case, I realized on about September 14th that Games Workshop's in-store Armies On Parade event was happening in a month. This, really, should be the one event that is marked on my calendar and I work towards all year. I don't actually play that much 40k, and mostly do all this conversion and painting work as a means of seeing a concept through to actual models. If I inspire some folks along the way, or encourage them to try to do more with their models, we'll that's great.

But Armies on Parade is pretty much the best possible place to showcase the kind of work I do. 

However, I always realize it's coming up late in the game, and don't have enough ready in time, and blah blah blah.

This year is different. With only a month's notice of the event, I sat down with Brother Pink, counted up the models I had painted, and realized I could make a halfway decent showing of my Haemonculus Coven of the Unmarred. What ever hesitancy I had was cleared up when both Brother Pink and Mike Onyszczak from Games Workshop Yonge & Lawrence in Toronto BOTH kicked me in the ass and told me I needed to make this happen.

And it's a good thing they did since I wound up taking home a silver medal!
I will be doing a more full some post on the WiP for this board and how it came together, but, for now, I wanted to share some quick photos of the completed board as it appeared at Armies on Parade in October.

ENJOY!


Krak, Made to Order!

$
0
0
Hi, Everybody!

It's Brother.P, the brother of Mr. Pink!

This Holiday Season, GW is giving back in countless ways. Firstly, there is now a retailer in my city that stocks GW stuff, including the entire line of paints! Secondly, GW introduced 'Made to Order'. Giving folks the chance to relive the glory days of pewter models which helped us develop our upper body strength. (Note: pewter is the tin/silver metal originally used for casting GW models, well, after they stopped using lead)

I want to count down the top 10 models that I'd love to see get the 'Made to Order' treatment. To all the Dark Eldar, Tyranid and Genestealer Cult enthusiast; be warned, this is mostly a list of Imperial models.

"Oh, hello Officer. I was just admiring your shotgun, yes, I will move along"


10) I coveted this Adeptus Arbite (w/ shotgun) when I was ~ 11 years old. I bought a blister of Arbites with boltguns because they were marginally cheaper ($9 vs $12). They were the same pose, but the boltguns were hardly as impressive.

I love old miniatures that were cast as a single piece. Models that come in two or more pieces are always a pain to pin together. In the back of my mind there is a constant worry that at some point a piece will break off. There are quite a few of these 'one-piece' models that make an appearance on my top 10 list. They hold a special place in my heart because I foresee the children of our post-apocolyptic future playing with the models long after all the paint has worn off, and the model is still in one piece! Also, it's the kind of model you can give to a six year old kid to screw around with, then when the kid turns 13, you say: "Now you paint it!".


9) Chaos Squat. I love the pose of this model (if you ignore the backpack; it's all in one piece). Also, I though I should include at least one squat in this list for posterity.... but I'm not sure I know exactly what 'posterity' means...


8) Inquisitor Elvis. This model's hair looks a little bit like a "cool guy" hairstyle, but he's got a book! Inquisitors have a book as a wargear option! GW actually sells a very similar model with a helmet, and sword replacing the book, but this guys is super cool, look at that hair.


7) Plastic Gothic Ruins, technically, I think the Made to Order models are only old pewter models, but if GW is dusting off old moulds; they should be able to make a few of these. As scenery pieces go, they didn't do much to block line of sight, but they were still beautiful models. They're the perfect accoutrement for a diorama or a display base for your super sexy centrepiece model.


6) Necromunda Bulkheads. Everybody loves Necromunda Bulkheads. The cardboard terrain that they supported was a bit chintzey, and degraded over time, but afterwards the bulkhead pieces were perfect for building your own custom terrain with. Each bulkhead has a ladder built in, which is so handy in-game. I'd love to see GW providing more avenues for gamers to get cheap and customizable terrain on the table. I feel having a table loaded with terrain does wonders for drawing new people into the hobby.


5) Sternguard. REAL Sterguard. These guys don't wear dresses. A while back I combed ebay for a set of these Sternguard. The optic scopes on the top of the gun tend to get bent very easily, but other than that, these guys are fantastic models.


4) 3rd Edition Death Company. A common criticism of early Space Marine models, is that they are too short and their hands are too big. These guys pass both tests. They are such wonderful Death Company models. Right now I'm making a squad using the old pewter jump packs mixed with the new plastic death company arms, and they are truly impressive.

The death company model on the right is that it is the same pose as my Blood Angel Apothecary and they have just slightly different iconography.


3) These Space Marine Scout were released near the end of the 2nd edition. Jes Goodwin sculpted a huge assortment of these metal scouts, and (disregarding the heavy bolter) they were all one-piece models. The later edition scout models tried to reproduce Jes's design elements, but few did them justice... (faces... cough. cough.)

This shotgun scouts has an almost identical version carrying a boltgun. This model differs as it is loaded up with ammo and he's one of the rare scout models sporting the re-breather.

I'd gladly list each of the Jes Goodwin scouts here (I own and love them all) and if GW releases these guys as "Made to Order" I'd highly suggest picking up one, and only one. Painting these models is rather tiring despite how wonderfully they've been sculpted. With a model in Power Armour, you basically paint the whole thing one colour, and then paint the extra details. Scouts, on the other hand, have cloth pants, army boots, belts/webbing/holsters, weapons, a bare head and their armour. There is not one dominant feature to start with. All of these different element compound the challenge of painting the model... but I still love them. If I was ever in the movie 'Inception', my 'totem' would definitely be one of these pewter scouts.


2) I love scouts and snipers, and these old Tau Pathfinders bring the two elements together. They were the first Tau models that showed up in the White Dwarf... and they told you absolutely nothing about the Tau (except that tau have 4 fingers and hoofs). But they are dynamic, and they are lot less tiring to paint than the Space Marine scouts. I love that some of the pathfinder models are really low to the ground, because these guys need cover, or a gentle breeze will wipe them from the table. Also with pewter models, being low to the ground means they won't be knocked over so easily.

Be aware: pewter models fall over easily. Furthermore their weight means it is likely they will chip when they fall over. I now put weights in all my bases, and I really should apply a matt coat to seal them.


1) NUMBER ONE!!! The Battle for Macragge Pilot. This guy is great (despite having crashed an Aquilla Lander). You had to buy a starter box just to get him (and his aforementioned jet). He has no use in-game, but just look at him. What's not to like? His little lunch box, his weird bolt pistol, his lack of a neck. Like almost every model on my Top 10 list, at one point this pilot was in my collection, and like most things I cherished; my brother, Mr. Pink gave it away. I'll forgive him just this once because he gave it to his German buddy Hydra. The guy had crossed the ocean to attend what may have been the last Games Day in Canada (and made off with a Golden Demon or two). Hydra also painted this pilot model for our display board, so it would have been a dick move to hold onto it.


Well Everybody, that's it! That's my top ten list of amazing old models. It's funny, but if any of these guys ever became "Made to Order" I wouldn't buy them. I've already bought most of them off of ebay.

What I like about this "Made to Order" campaign, is that you don't have to through a back-ally dealer to get ahold of excellent old models. Hopeful this means lower prices too. (I honestly have nothing against ebay sellers, the shipping cost are what I truly hate)  Furthermore if you're buying freshly cast models, it means you don't have to go through the pains of stripping some of the most questionable, indelible paints you will ever encounter.

Let me know what you think. Also please encourage Mr. Pink to share some of his favourite old models, and make your own Top 10. A bunch of the images I used come from an amazing website. It's a great catalog of a lot of models I never knew existed!


Honourable mention: the Warrior Acolyte.  In the forty first millennium, most models are armed to the teeth, but this guy just brings a notepad! You know the mechanicum installed the largest pair of brass ball on this servitor.
He.   Don't.   Give.   A.    F  LI  C  K.

Haemonculus Coven - Timelapse of Display Board Construction

$
0
0

While working on the display board for my Haemonculus Coven for Armies on Parade 2016, I decided to set up my camera to make a timelapse recording of the sculpting and some of the painting.

Unfortunately, I'd already built the actual board when I had this idea, and I stopped the timelapse at the point where I pretty much messed up the painting on the flesh bits and had to redo a lot of it.

So, though this is incomplete, I hope that people find it interesting. I've sped it up a bit as it's a bit boring to watch someone sculpt spinal columns for several minutes!

Enjoy, and let me know if you'd like to see more videos!

Paint Yoshit Challenge

$
0
0
Hi Everybody!

It's Brother.P  (brother of Mr.Pink)

If I'm good at one thing, its driving my brother crazy. Last time I challenged him, he put me in my place and got a bunch of Genestealer Cult miniatures painted, and won some Gal Vorbak for his troubles. When I was given a similar challenge to paint Blood Angel Scouts, I majorly failed... Now I'm stuck buying my own Word Bearer Shoulder pads.

Anyways, this year I've got a new competition. From January until the end of March, Mr.Pink and I will compete to see who can get more models finished. This competition is just two brothers trying to finish the most models to put the other to shame.

last model I painted before this comp. starts


We're calling it the "Paint Yoshit Challenge" or the P.Y.C.

Quantity is not necessarily quality, therefor the winner will be decided by readers of this blog. Whichever month comes after March, we'll each post a gallery of everything that was painted. Readers vote for which of us produced the more/better looking stuff, and the winner issues a challenge to the loser which must be completed during 2017.

This is a competition I'm bound to win! My problem with the earlier challenge of painting Scouts, was that after a couple days I wanted to bail on that project and paint something completely different. This challenge, it doesn't matter what I paint, if it is cool or interesting, hopefully I can lure more votes my way.


Mr.Pink is a fiend when it comes to conversions, and in this competition, it'll only slow him down. Finally, I want the readers to realize; if their votes makes Mr. Pink win, then he'll order me to do something, BUT if I win I have an inside scoop of wondrous conversion that have been on the back burner, or have been sitting in Mr.Pink's mind waiting to be realized. I could potentially order him to convert some Gal Vorbak, or finish his amazing Tyrannofex, which he started before there even was a Tyrannofex model!! (voteforme)


However, if you vote for Mr. Pink and he wins, he'll probably order me to finish the Kroot Tyranid hunter he made for my birthday, years back, so that might be a reason to vote for him.
[I'm actually painting this DURING the P.Y.C]

Whoever wins, hopefully we will both churn out some cool, painted models for your viewing pleasure in the process!

Paint Yoshit Challenge: Week 1 Update

$
0
0
The Paint Yoshit Challenge was suggested by Brother Pink. It is a race between the two of us to see who can paint more minis between January 1st and March 31st. I'm happy to report that, at the end of my first week of the challenge, I'm off to a pretty strong start!

Inspired by my Instagram buddy VulkanHesten, I also succeeded in doing at least one hour of painting every day!  I'm hoping to keep this up for all of January, but we'll see how it pans out.

Further, I signed up for my first ever tournament, which is pretty huge as I never play. However, Brother P. and the dude who beat my Haemonculus Coven at Armies on Parade both assure me that my conversion and painting chops, added to the crazy tactics of the cult, should serve me well at the tourney. Right now it's mostly serving as added motivation for delivering on our Paint Yoshit Challenge.

Completed this week:


- 7 Neophytes, which I had previously gotten to minimum standard to play a game of kill team.
For these guys I experimented with Object Source Lighting (is that what it's called?), adding highlights to their shoulders and guns as if the shoulder lights on their mining armour were illuminated. It began as a flight of fancy, but morphed into something else as I obsessively blended black to grey to white.

I did it as a laugh, and it turned out way better than I'd expected! I even went so far as to wash in shadows on the opposite sides of their faces from the lights!

Other progress:

- Started painting 3 more Neophytes and 6 Acolytes that I'd previously airbrush undercoated. I hope to finish these before the two week mark.


- Finished modeling my 12-man Enforcer squad. These guys are just Neophytes with shotguns, but I was inspired to give them all sweeper hackers so that they could be used as a kind of elite escorts fit the bejacketted Primus.

The conversion is a pretty simple one that I'll detail in a future post. Also, while working on these guys, someone asked on Instagram for a tutorial for sculpting hoods, so I took some photos and will be putting one together.

One additional thing I've challenged myself to so this week is to wake up earlier and get my hour of painting in before leaving for work. We'll see how that goes...


That's all for this week's update. Let me know what you think of my progress so far, and I'll see you next week!
Viewing all 150 articles
Browse latest View live


Latest Images